Testing Low Light Vs Image Quality
While minimum illumination ratings imply a magical point where image quality goes from good to bad, the reality is that image quality gradually degrades as lighting levels lower. In this report, we share test results showing what this looks like and the rate of decline.
We took three well-known surveillance cameras (from Axis, Arecont and Sony) and put them side by side for a simultaneous shootout from 1 hour before to 1 hour after sunset, recording images and lux ratings at 10 minute intervals. We placed a subject carrying an eye chart at a 30 foot wide FoV. Here’s an overview of the scene used:

These tests were performed at progressively lowering light levels of:
- 7,000 lux
- 4,000 lux
- 3,500 lux
- 2,300 lux
- 1,800 lux
- 900 lux
- 330 lux
- 40 lux
- 6 lux
- 3 lux
- 2 lux
- 1.5 lux
- <1 lux
The minimum illumination ratings of each of these cameras also varied, as follows:
- 3.1 MP Arecont: 0.3 lux color/ “Day/Night: 0 Lux, IR sensitive”
- 1080p Sony: 0.4 lux color/0.25 lux black & white @ F1.2
- 720p Axis: 0.4 lux color/0.06 lux black & white @ F1.2
Did these lux ratings hold true? Ha!
Overview / Key Points
Image quality fell modestly when light levels were over 500 lux, but then started to drop significantly from the 300 to 3 lux levels. All of the camera experienced significant visual quality loss far above their rated lux ratings.
This image shows a comparison of seven decreasing lux levels, for reference (click for full size):

Lux Level Examples
Official sunset on the day of this test was at 4:51 PM. We set our scene at 3:50 PM and began recording starting at 4:00. At this time, the day was still very bright at over 7,000 lux. All cameras displayed clear video with little noise.

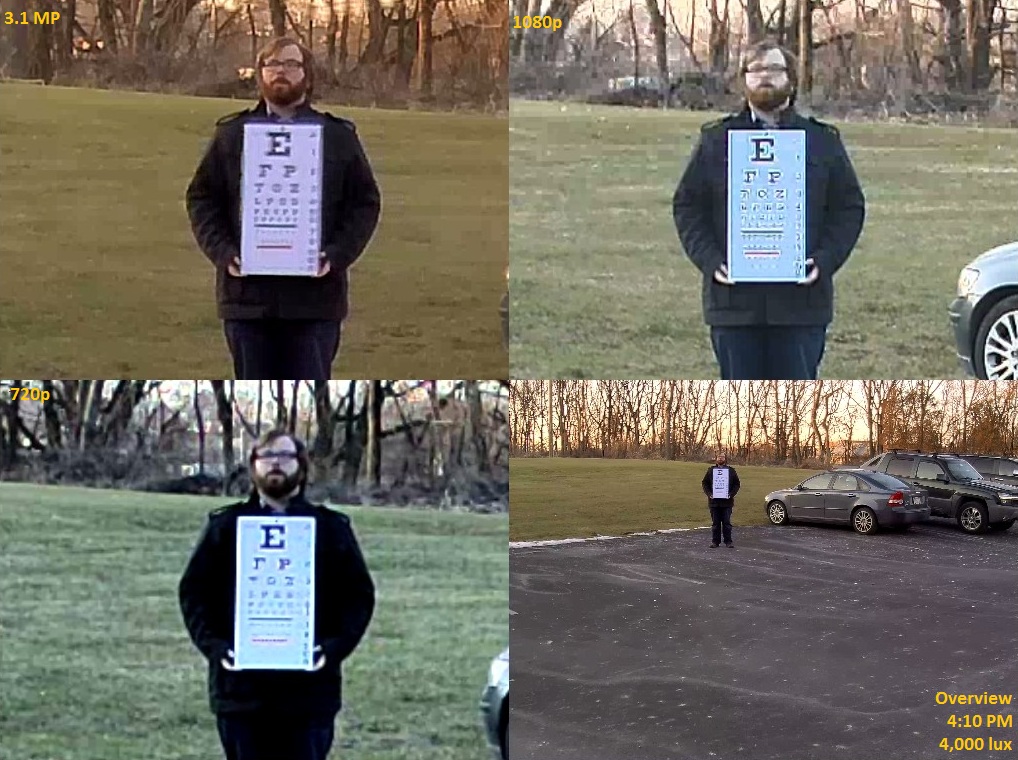
At 4:10, the results were approximately the same, with light levels dropping to about 4,000 lux.
At 4:20, dropping down to ~3,500 lux, the 3.1 MP camera began to display a notably dimmer image, while 1080p and 720p models remained fairly close to earlier ones.

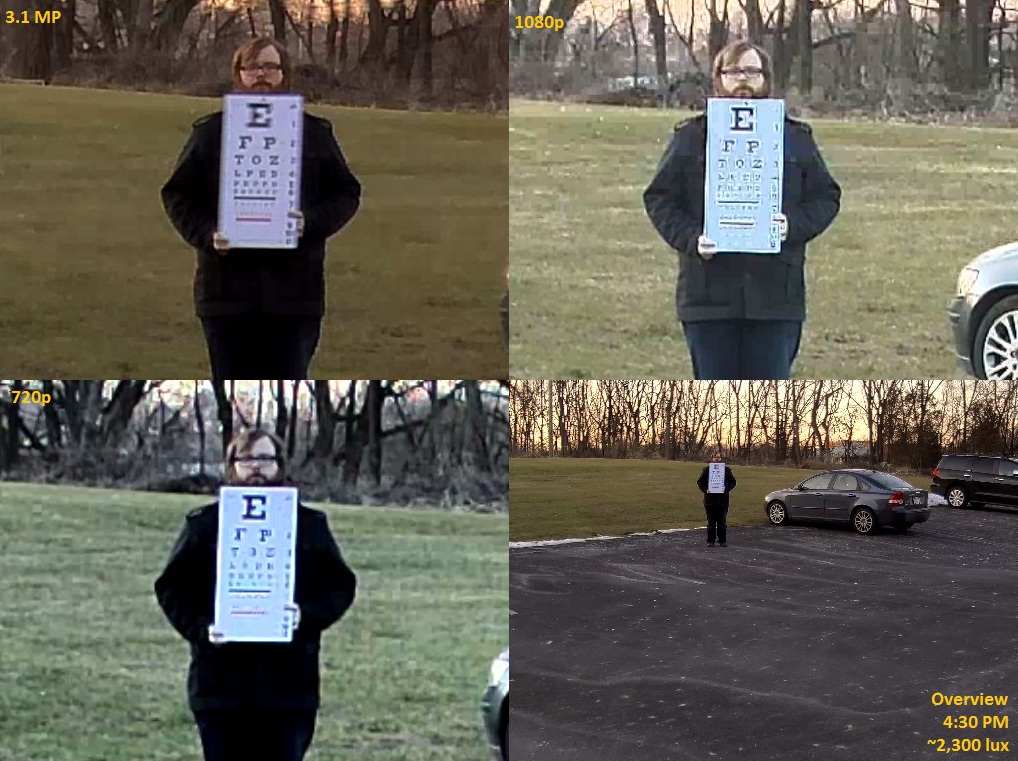
At 4:30 PM, at ~2,300 lux, results were similar to the previous, with little change in any image quality.
Little change at 4:40 PM and ~1,800 lux:

Around sunset at 4:50 PM and ~900 lux, close inspection reveals visible noise beginning in 3.1 MP and 1080p cameras, though not a lot:

5:00 PM, at ~330 lux, continues this with noise more pronounced especially in the 1080p camera. At this point, light levels were reduced by about 95% from our starting point of 7,000 lux.

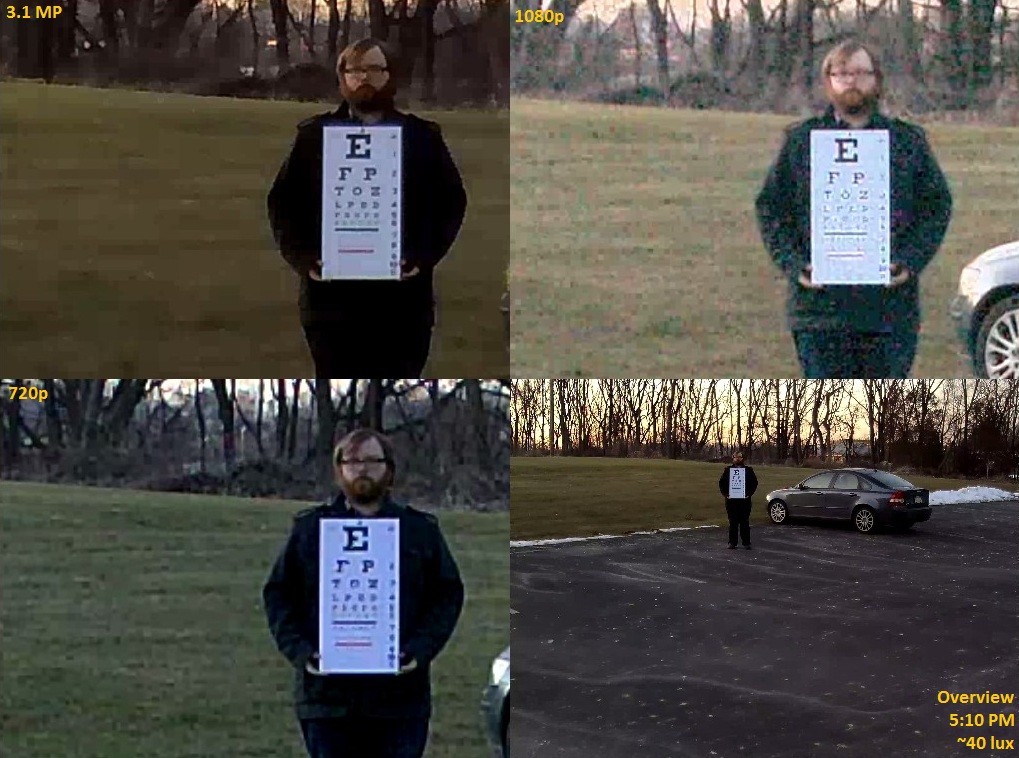
As the sun continues to set at 5:10, down to just ~40 lux from ~300 lux ten minutes prior, we see a jump in visible noise in the 1080p camera. The 3.1 MP and 720p models remain pretty steady, with the 720p camera only modestly dimmer than when the test began.
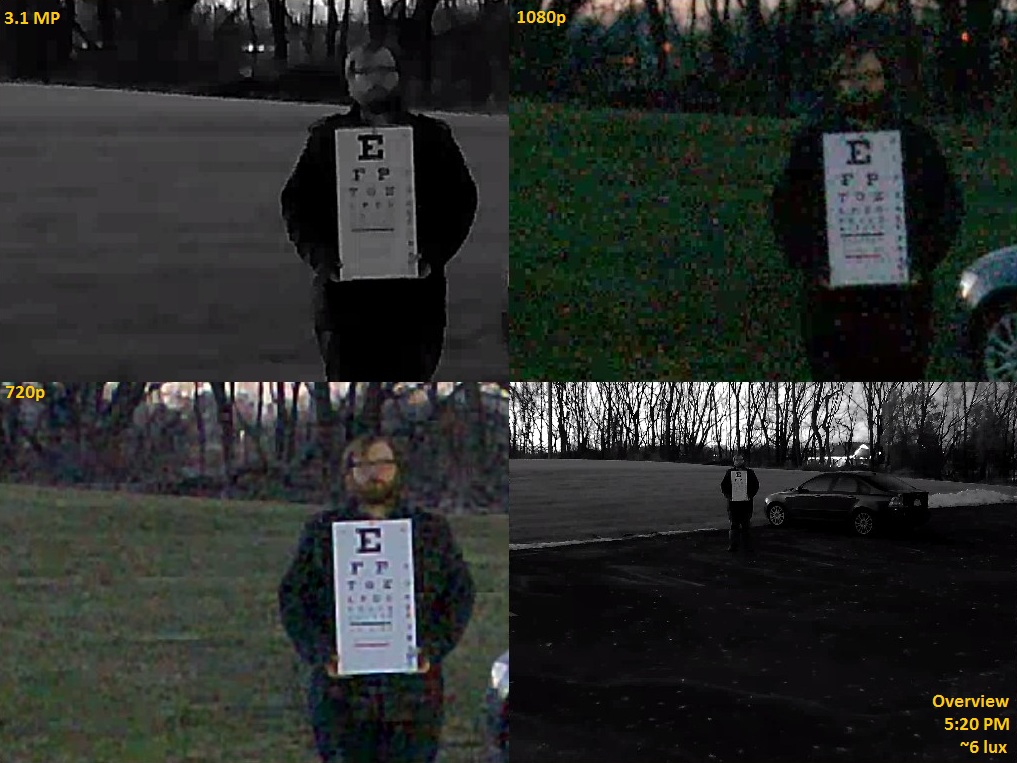
At 5:20 PM and ~6 lux, the 3.1 MP model switches to night mode, the first camera to do so, at around 6 lux. Noise continues to increase in the 1080p model, and sharply increases in the 720p camera, both still in color mode.
At 5:30 PM and ~6 lux, the increase in noise in the 720p model begins to negatively impact our ability to recognize the subject. The 1080p camera has cut over into night mode at this point, and noise is somewhat lower than in the previous color image.
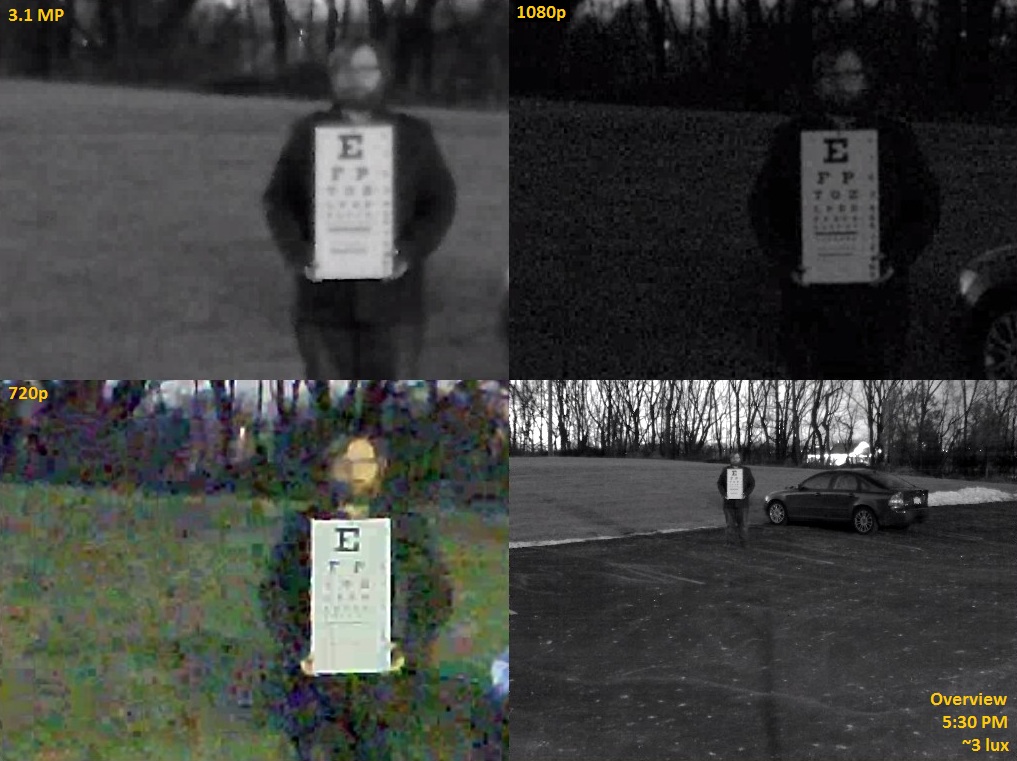
Noise continues to increase in the 720p image at 5:40, with the camera still in color mode at ~2 lux. While dimmer, the 3.1 MP and 1080p models provide approximately the same image quality as at the prior light level.
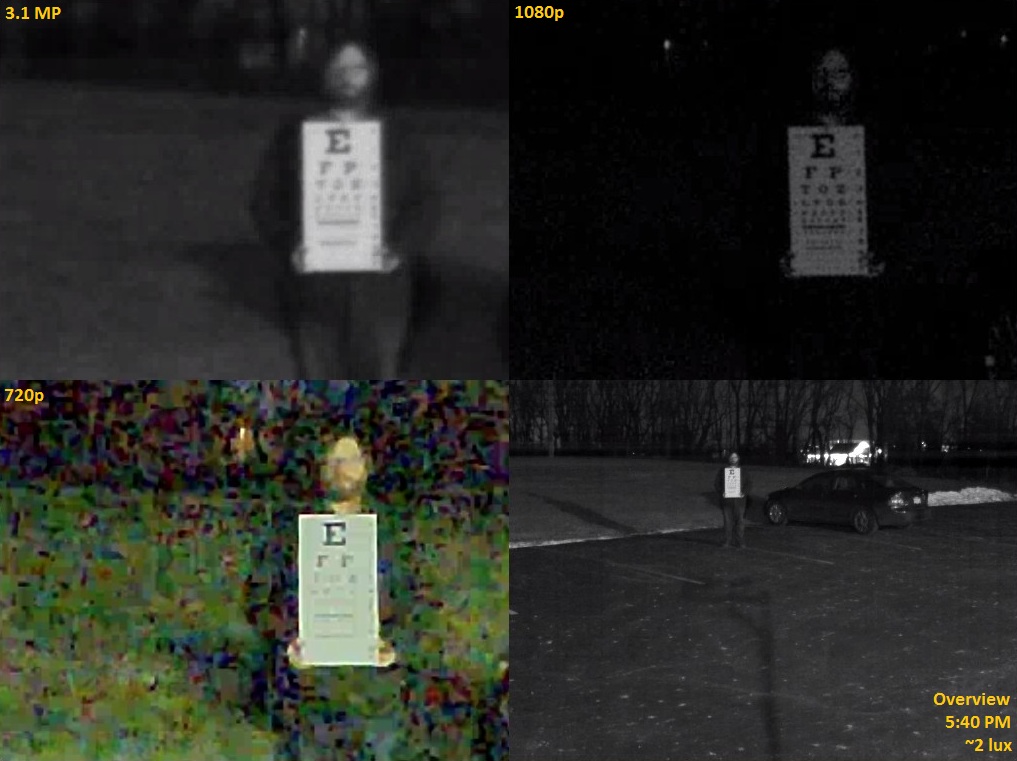
The 720p camera finally switched to night mode at 5:50, though noise remains constant. At this point, the sun had fully set, with outdoor lighting providing a constant 1-2 lux scene.
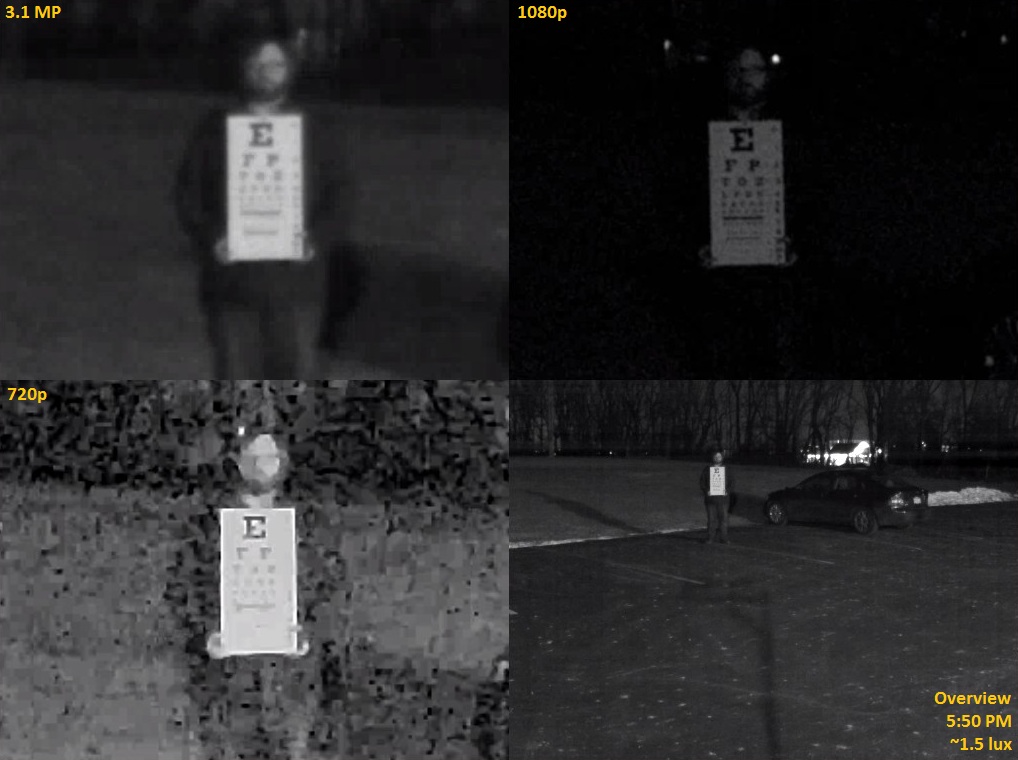
Switching off the outdoor lights, the light level drops below 1 lux. The subject is still detectable in the 3.1 MP and 720p cameras, though details cannot be made out. The 1080p camera provides no usable footage of the subject at this light level.

Methodology
Key steps for setup included:
- All cameras were reset to factory default.
- Shutter speed was standardized to 1/30s.
- Auto back focus was run on the 720p and 1080p cameras, but was not supported on the 3.1 MP model, which was manually focused.
- Day/night cutover settings were left defaulted. This resulted in all cameras cutting over at differing times, as can be seen in the images.
The specific models used were an Arecont AV3116DN, an Axis Q1604 and a Sony SNC-CH240.